

Partners
Partners represents your master directory of external entities. Every transaction, ticket import, or allocation contract requires a resolved partner profile to accurately map commercial ownership and transportation logistics.
Open Admin → Partners in the app (/partners).
Where to go in the app
Step 1 — Navigate to the partners page
- In the primary sidebar, navigate to the Admin section.
- Click Partners.
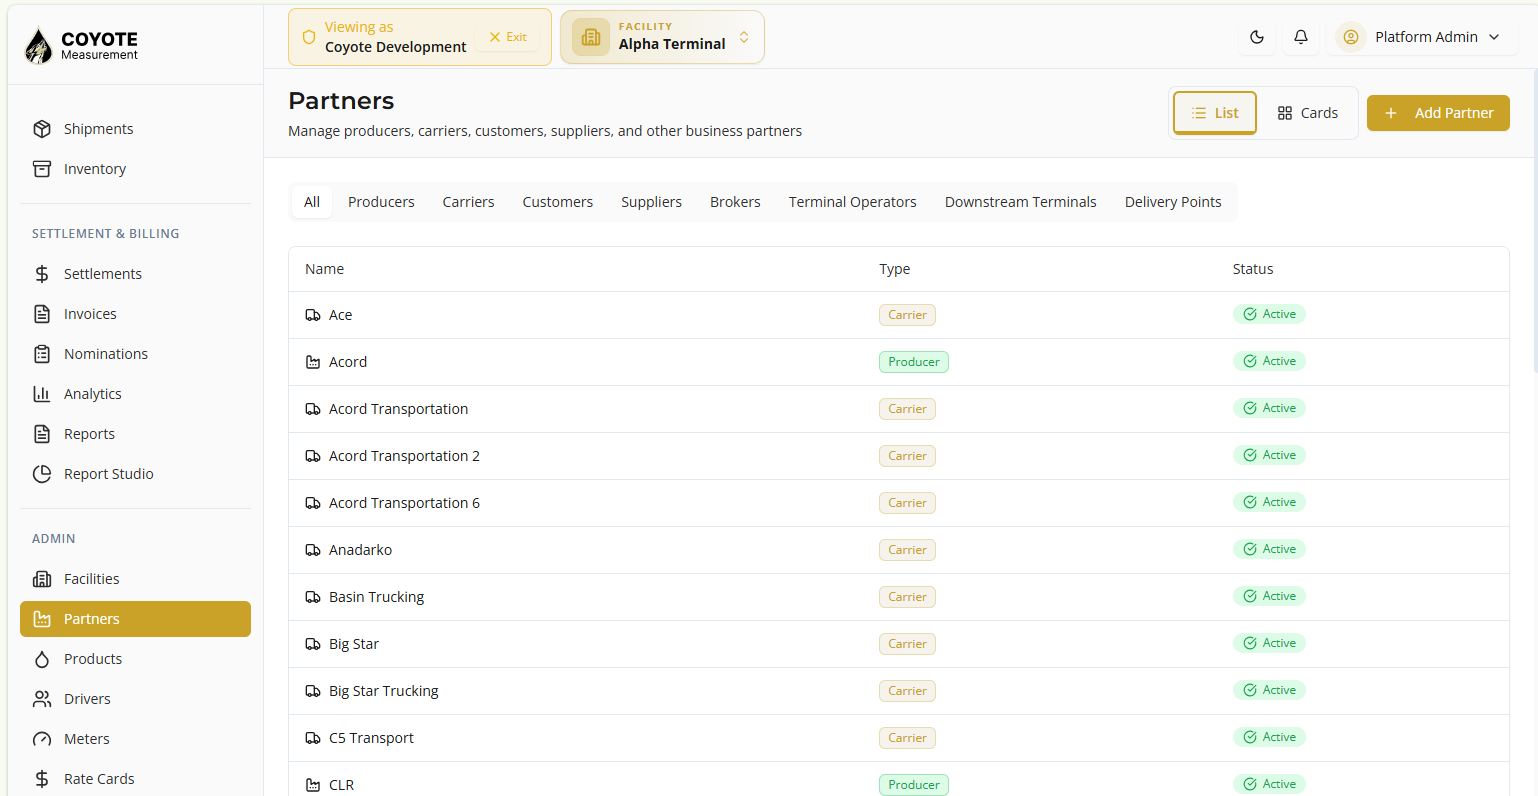
- The partners list appears displaying all master partner entities, their classification types, and current system availability status.
Columns
| Column | Description |
|---|---|
| Name | The legal or primary display name of the company (e.g., Ace, CLR). |
| Type | The commercial role(s) this partner plays in your ecosystem (e.g., Carrier, Producer). |
| Status | Operational availability state (Active or Inactive). |
Filters & Views
| Control | Use for |
|---|---|
| List / Cards | Toggle between a compact data table view or a visual layout card grid. |
| Type Tabs | Quick-filter the directory by a specific functional role (All, Producers, Carriers, Customers, Suppliers, Brokers, Terminal Operators, Downstream Terminals, or Delivery Points). |
Step 2 — Create a new partner
- Click Add Partner in the top right corner of the main page.
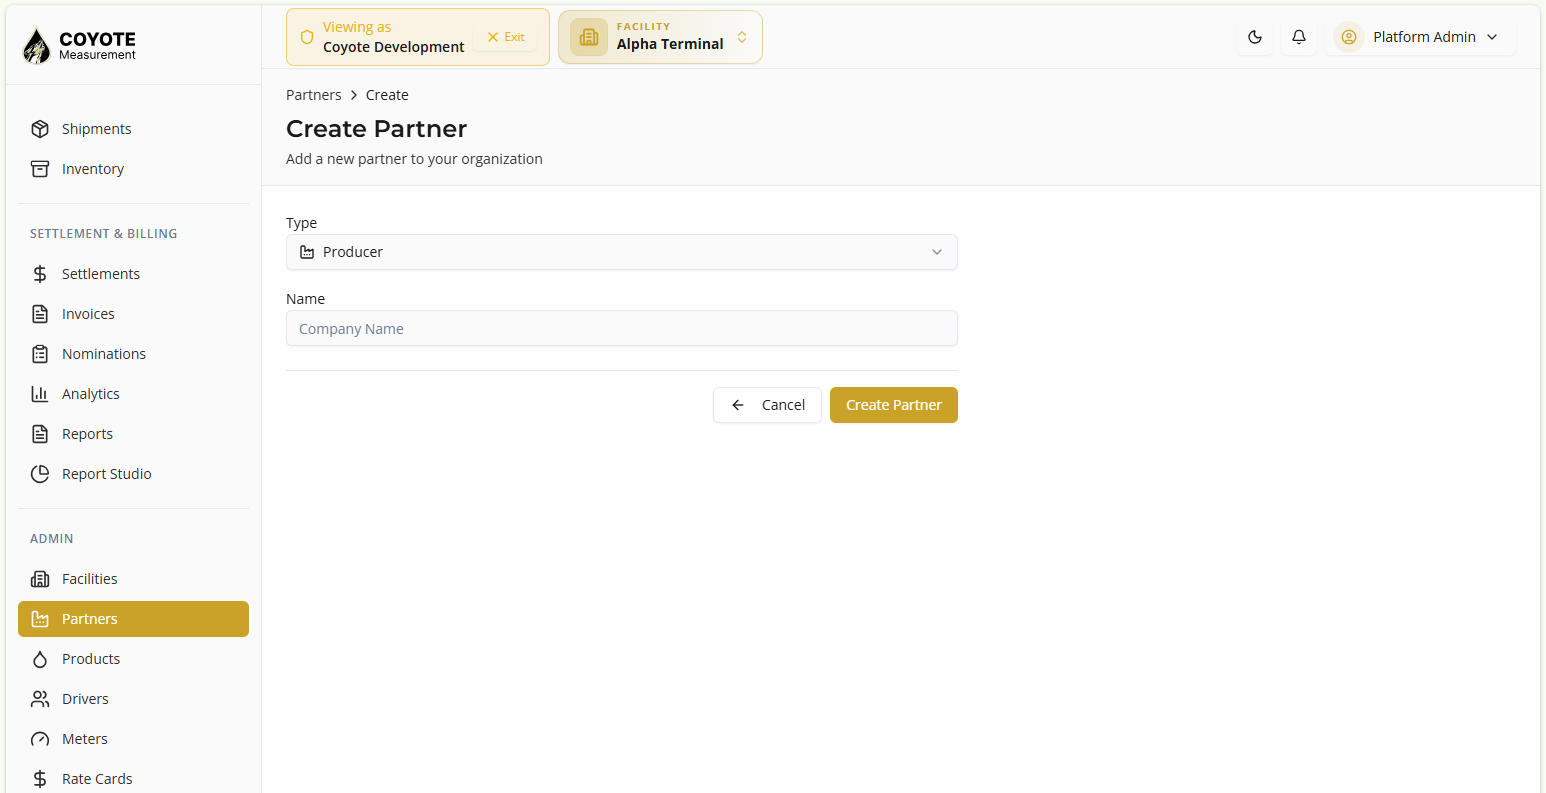
- The Create Partner form opens, allowing you to quickly provision a new entity to your organization.
- Select a Type from the dropdown menu. Options include: (Producer, Carrier, Customer, Supplier, Broker, Terminal Operator, Downstream Terminal, Delivery Point)
- Enter the Name of the entity in the Company Name input field.
- Click Create Partner to finalize and add the new entity to your master directory, or click Cancel to discard.
Step 3 — View Partner and further operations
- From the partners directory list, click any specific partner row or name to open its comprehensive details page.
- Five configuration and tracking tabs will display: Overview, Agents, Addresses, Code Mappings, and Relationship.
Overview Tab
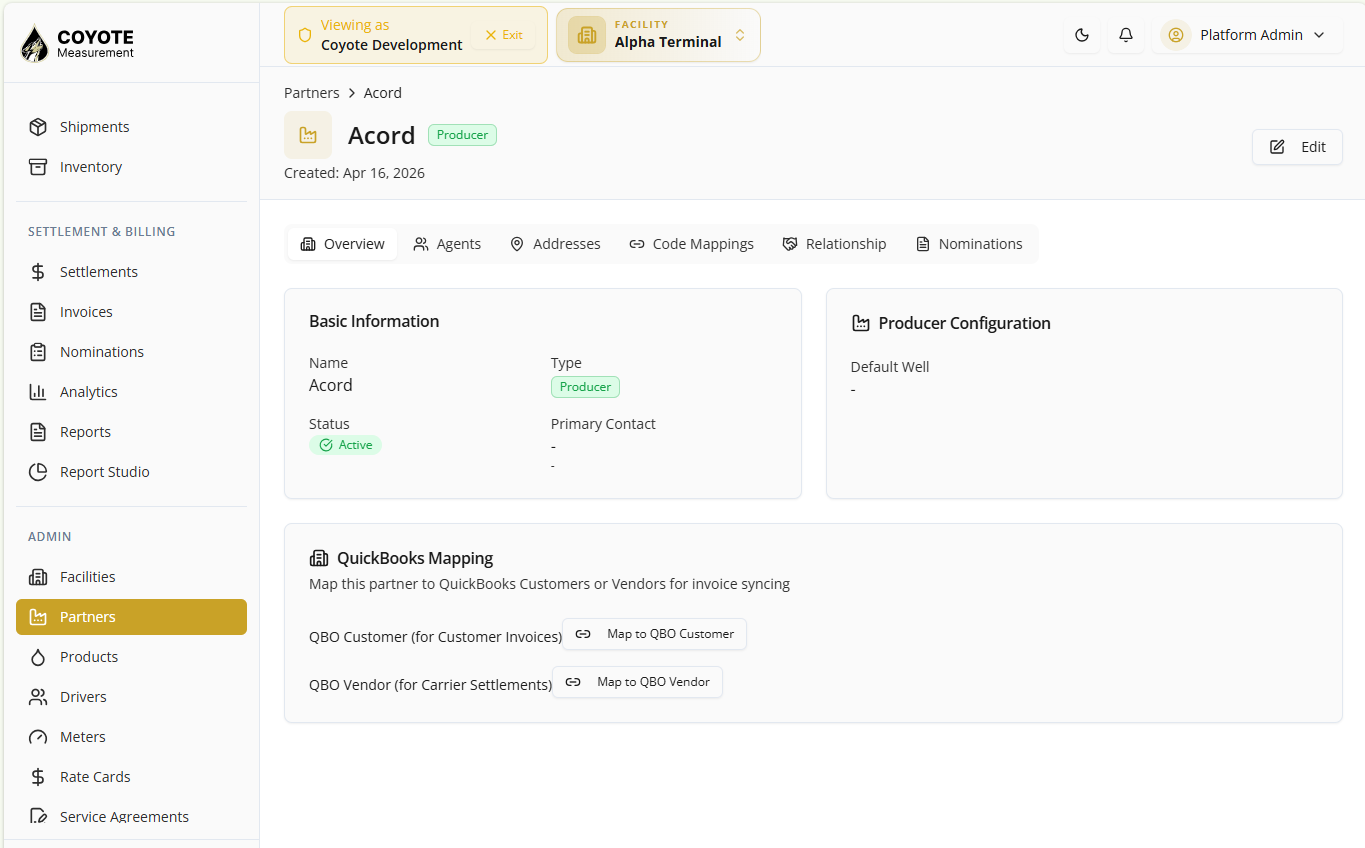
The Overview contains three specialized breakdown modules detailing core identity and system integrations:
- Basic Information: Displays the legal Name, functional Type badge (e.g., Carrier), operational Status toggle (Active or Inactive), and the assigned Primary Contact.
- Carrier Configuration: (Displays conditionally if the Carrier type is active) Tracks critical transportation credentials including DOT Number, MC Number, SCAC Code, and Insurance Expiry date.
- QuickBooks Mapping: Provides one-click accounting sync endpoints via Map to QBO Customer (for customer billing) or Map to QBO Vendor (for carrier transportation settlements).
Agents Tab
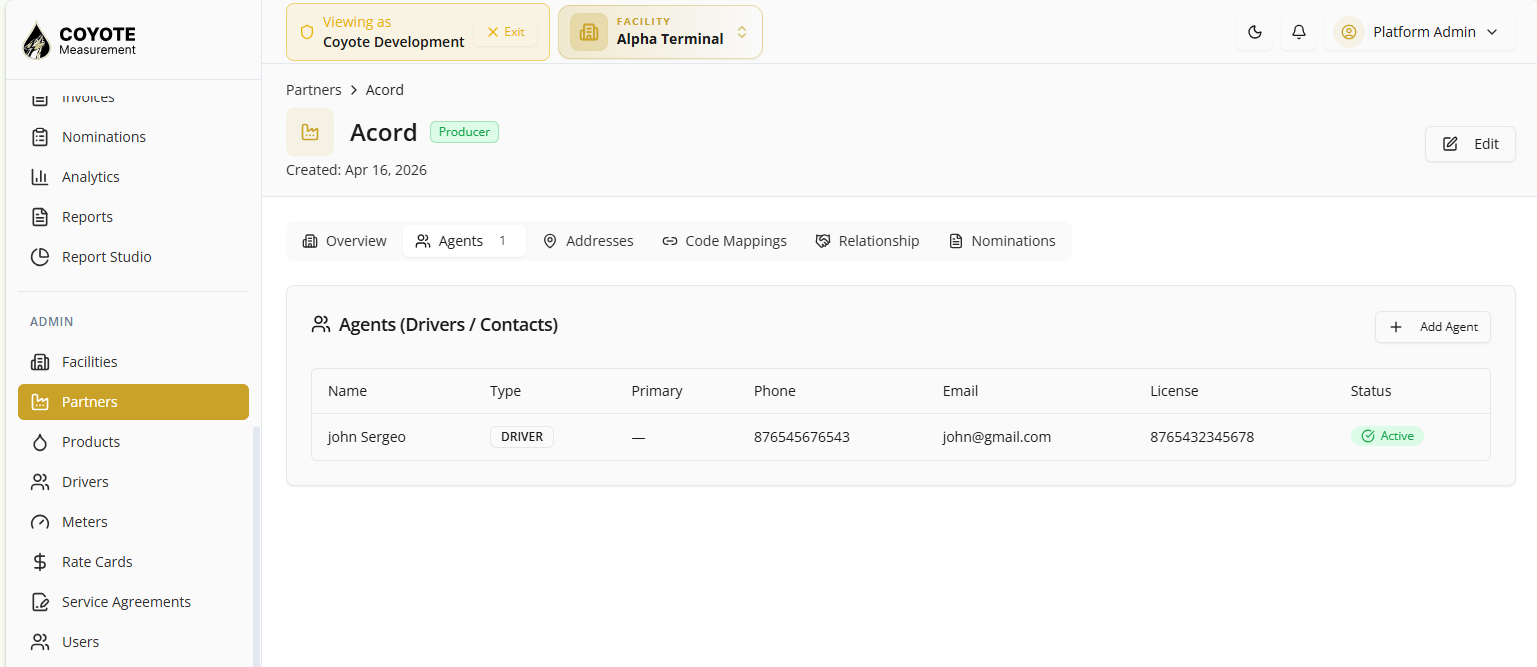
- Click the Agents tab to review the agents for the partner.
- List seen with name, type, primary, phone, email, license and status.
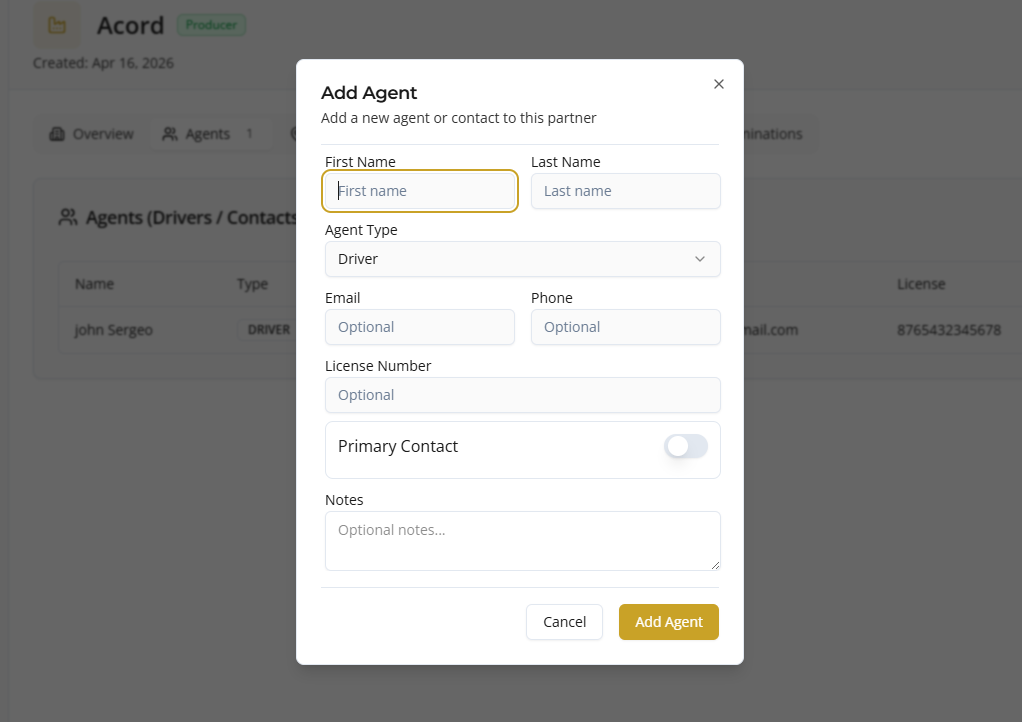
- To add agent, click of Add Agent button, The add dialog panel will appear over the screen.
- Enter first name, last name, Email, phone, license number.
- Select Agent Type (Driver, Operator, Dispatcher, Accountant, Primary Contact, Field Rep)
- Toogle on if its primary contact.
- Enter Notes.
- Click Add Agent to submit.
Addresses Tab
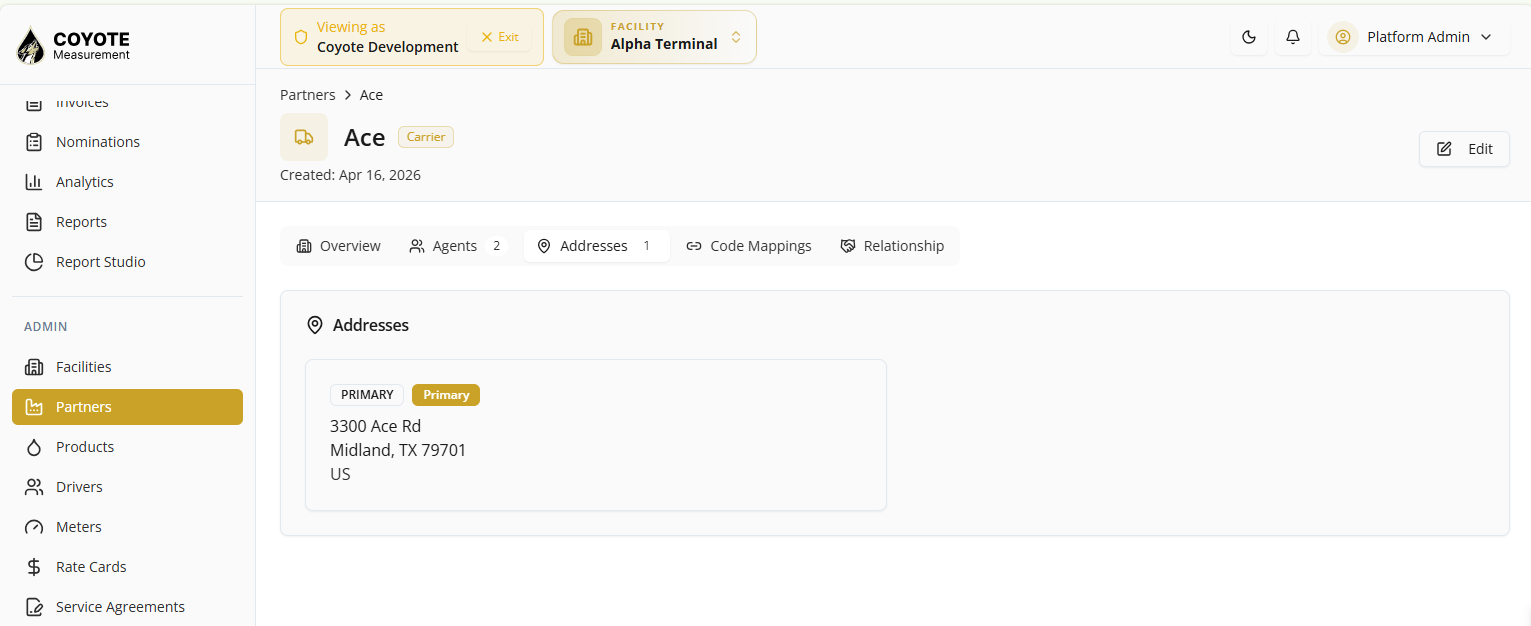
Click the Addresses tab to view the primary geographic profile for the corporate account.
- Unified Address Card: Displays a single, structured summary card containing the partner’s physical location details including the street address, city, state, zip code, and country.
- Labels: The card features system tags such as PRIMARY and Primary to easily identify the main billing or operational headquarters at a glance.
Code Mappings Tab
1. Accessing Code Mappings
- Navigate to the Admin section on the left sidebar menu.
- Click on Partners.
- Select your desired partner/producer (e.g., Acord) from the list.
- Click on the Code Mappings tab in the top navigation row of the partner’s profile.
2. Managing Import Codes
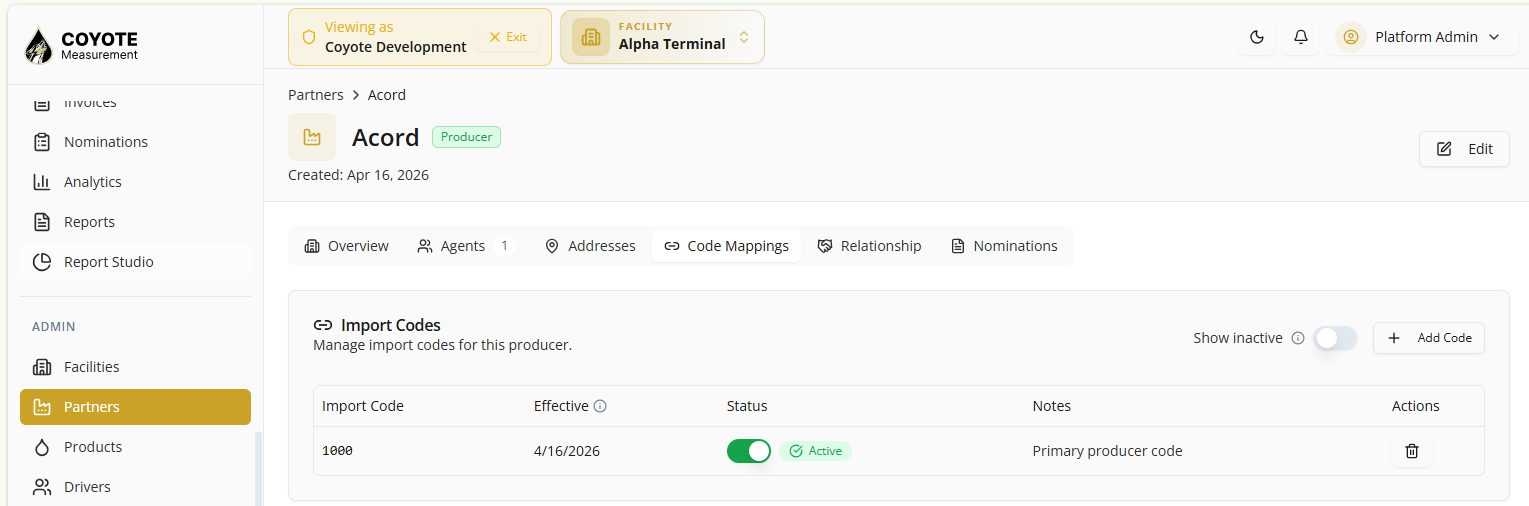
Viewing the List: Under the Import Codes section, you will see a table listing existing codes, their effective dates, status (Active/Inactive), and notes.
Adding a New Code:
- Click the Add Code button on the right side of the section header.
- Input the required import code details, effective date, and any relevant notes.
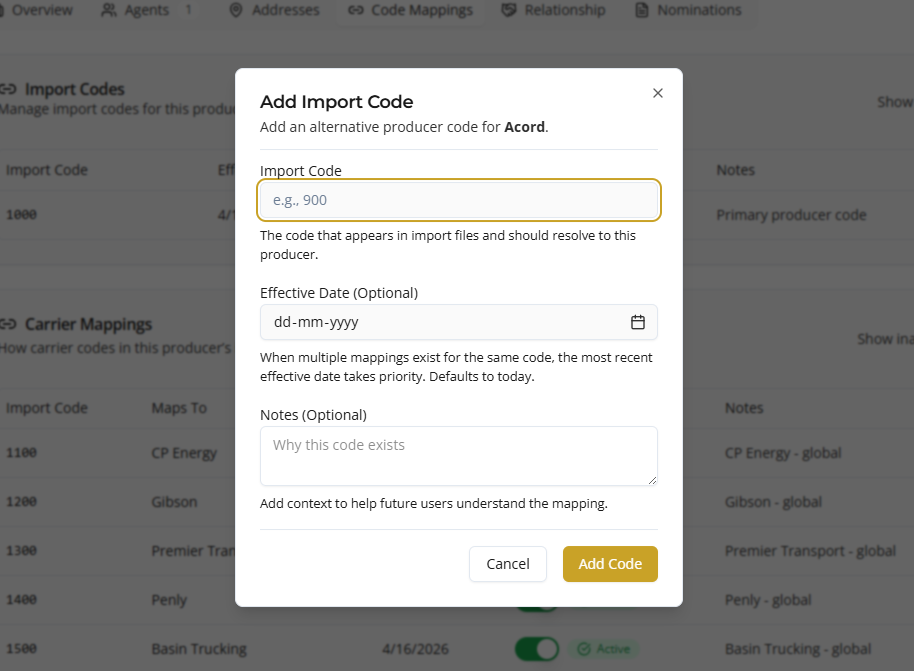
- Save to add it to the list.
Toggling Status: Use the toggle switch in the Status column to quickly switch a code between active and inactive.
Deleting a Code: Click the Trash/Delete icon in the Actions column to remove an import code.
3. Managing Carrier Mappings
Viewing the List: Scroll down to the Carrier Mappings section. Here you can see a large breakdown of system mappings (e.g., Import Code 1100 maps to CP Energy, 1200 maps to Gibson, etc.).
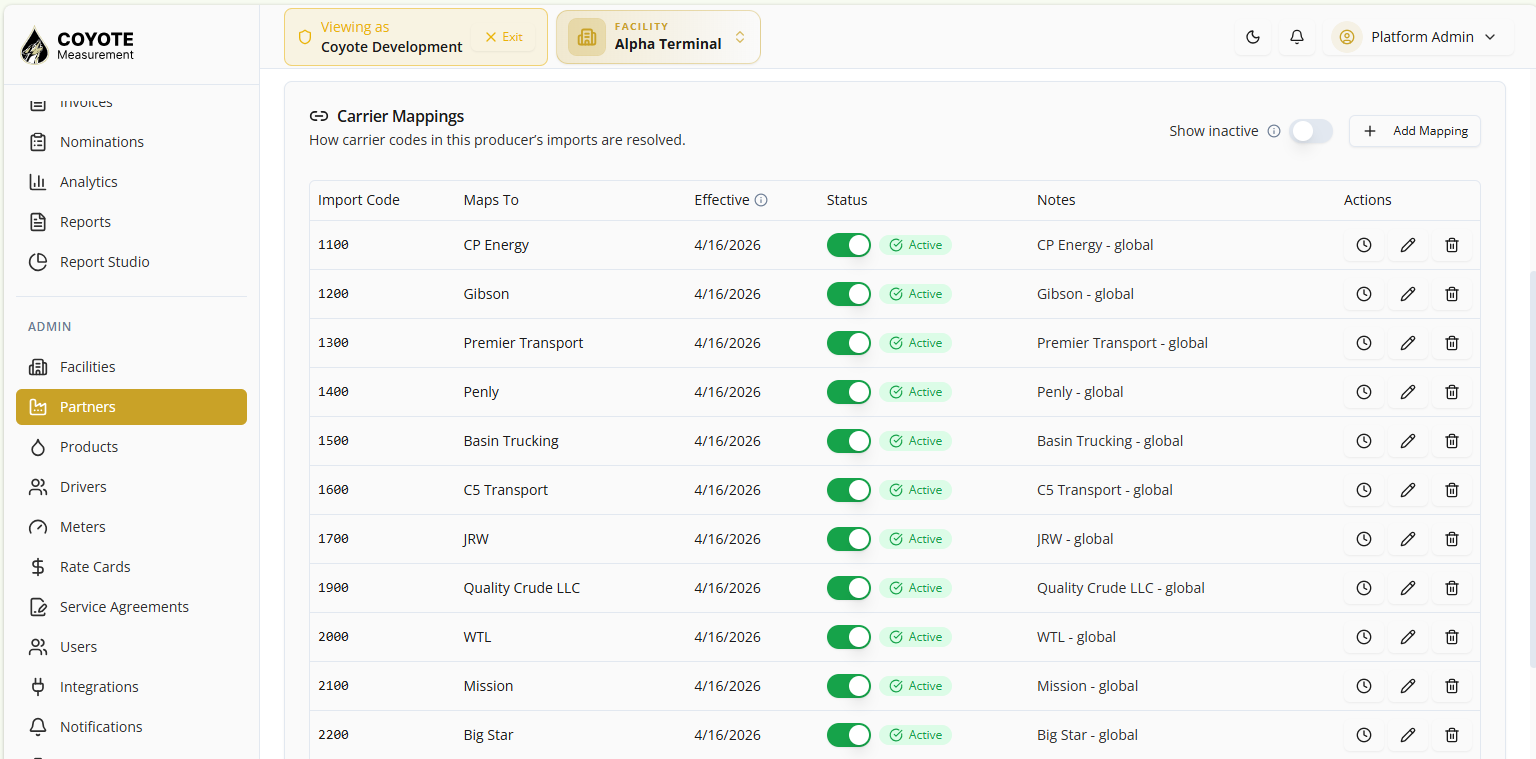
Adding a New Mapping:
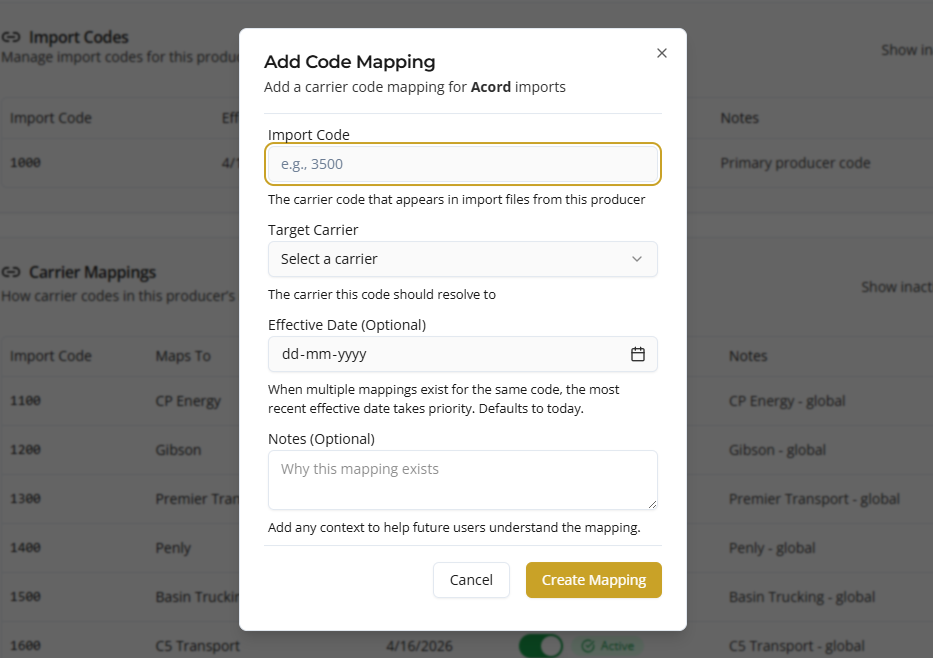
- Click the Add Mapping button on the right side of the section header.
- Enter the incoming Import Code.
- Select the global carrier it Maps To from the dropdown menu.
- Define the Effective Date and add any internal Notes.
- Save to finalize the mapping.
Edit Notes:
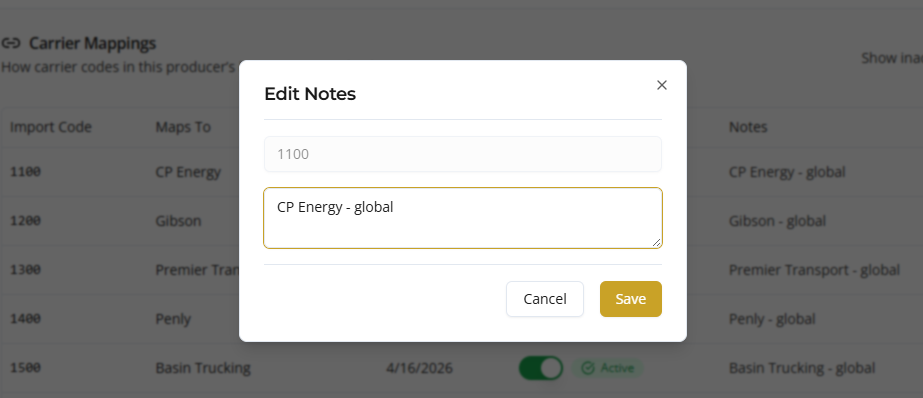
- Click on edit icon in carrier mappings list, and edit notes wizard opens.
- Code is seen non-editable, user can update notes.
- Click Save to update the notes.
Delete Mapping:
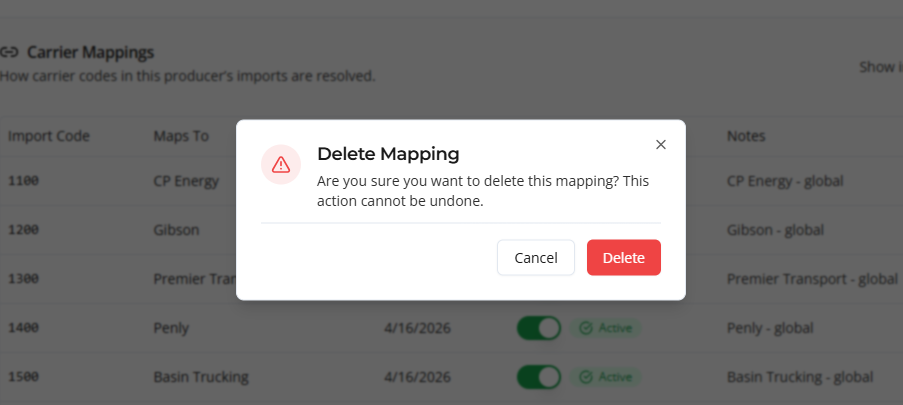
- Click on trash icon in carrier mappings list, and confirmation popup opens.
- Click confirm to delete the mapping.
Active / Inactive single or all mappings:
- Toogle specific entries status to active or inactive for single entry.
- Toogle Show Inactive from header to active or inactive all mappings.
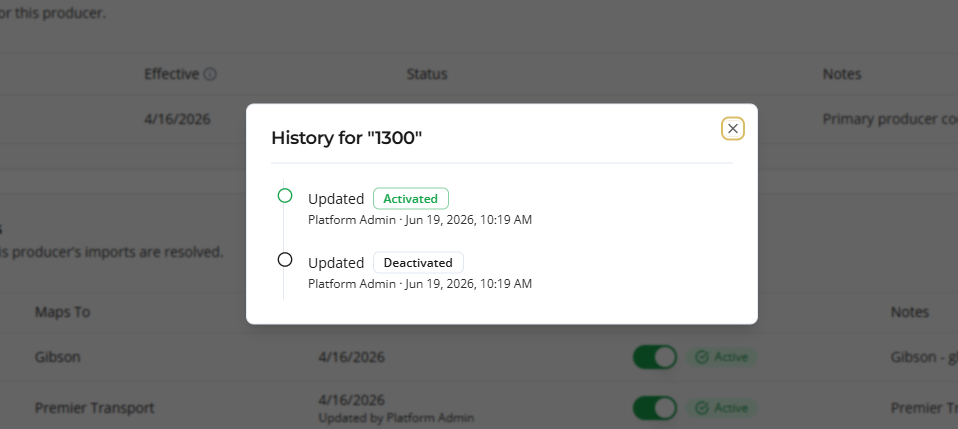
History:
- Click on history icon in carrier mappings list, and view history wizard opens.
Relationship Tab
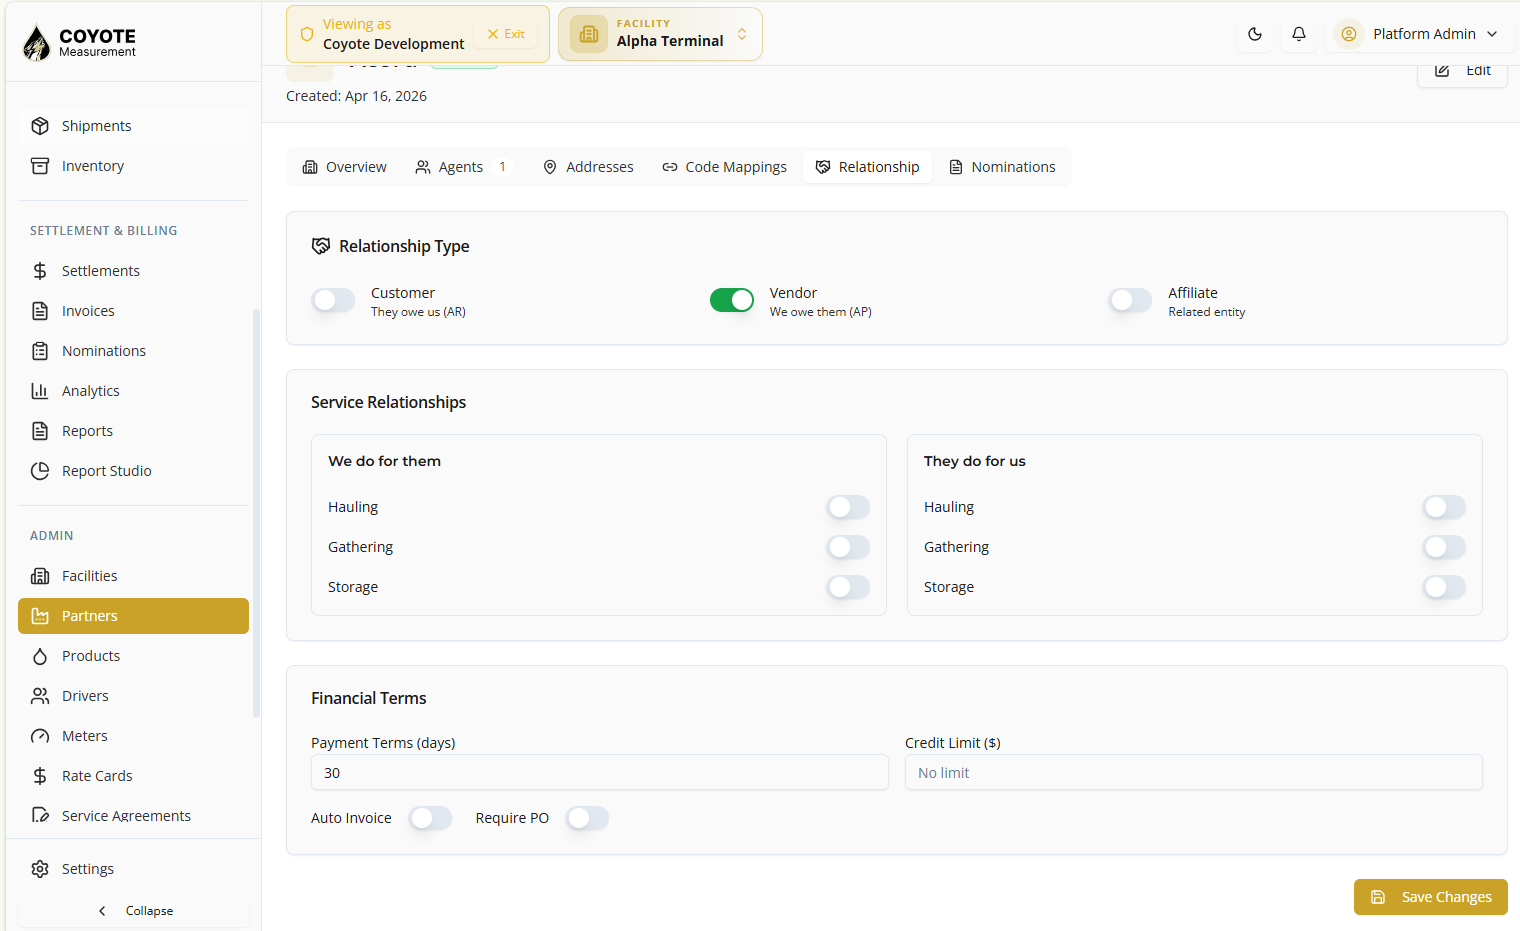
Click the Relationship tab to view internal and commercial network ties.
1. Configure the Relationship Type
Define the primary nature of your business relationship with the partner. You can toggle one or multiple options:
- Customer: Toggle this on if they owe you money (AR - Accounts Receivable).
- Vendor: Toggle this on if you owe them money (AP - Accounts Payable).
- Affiliate: Toggle this on if they are a related corporate entity.
2. Set Up Service Relationships
- Specify what services are being exchanged between your facility and the partner.
-
We do for them: Toggle the services your facility provides to the partner:
- Hauling
- Gathering
- Storage
-
They do for us: Toggle the services the partner provides to your facility:
- Hauling
- Gathering
- Storage
3. Define Financial Terms
Set the billing and credit parameters for the partner:
- Payment Terms (days): Click into the input field to set or change the net payment terms (e.g., 30 days).
- Credit Limit ($): Click into the input field to specify a maximum credit limit, or leave it as default (e.g., No limit).
- Auto Invoice: Toggle this on if you want system-generated invoicing for this partner.
- Require PO: Toggle this on if a Purchase Order number is mandatory for transactions involving this partner.
4. Save Changes
Once all options, toggles, and fields are configured to your satisfaction, click the Save Changes button in the bottom right corner to commit the updates.
Nominations Tab
- In the primary sidebar, navigate to the Admin section and click Partners.
- Select the specific partner (e.g., Acord) from your partners list.
- From the sub-tab navigation menu on the partner profile, click Nominations.
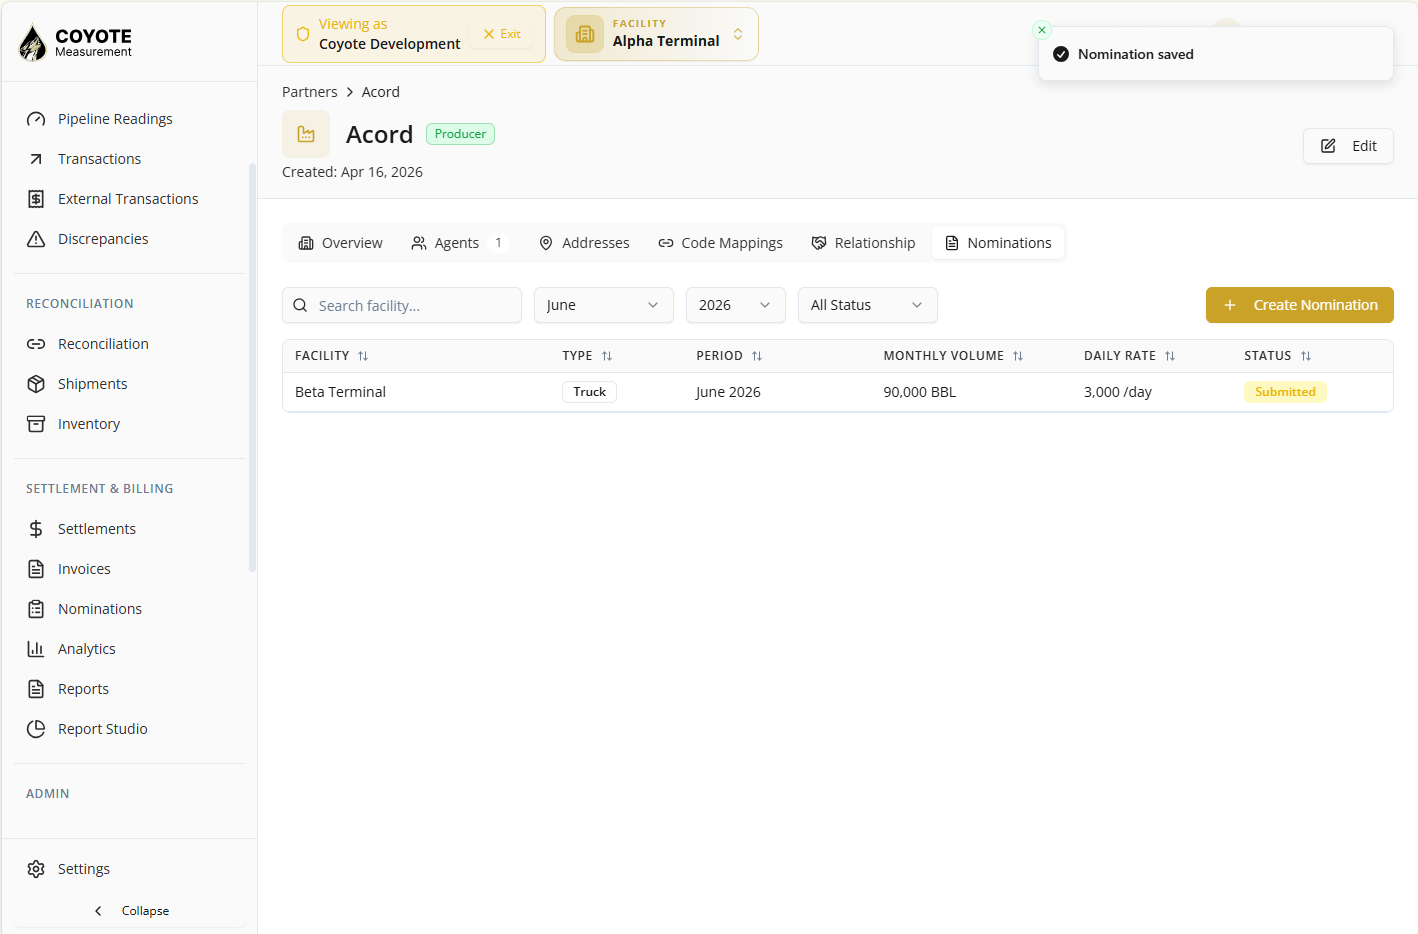
- The nominations view appears, allowing you to track and create product volume requests for this producer.
Columns & Fields
(Note: If no records exist, a “No nominations found” blank state will display instead of a data table).
| Column / Field | Description |
|---|---|
| Facility Name | The specific terminal or station where the nominated volume is scheduled. |
| Product | The type of commodity or product being nominated. |
| Volume | The designated quantity of the product allocated for the month. |
| Date / Month | The specific scheduling period the nomination applies to. |
| Status | The current lifecycle state of the nomination (e.g., Pending, Approved, Filled). |
Filters & Views
| Control | Use for |
|---|---|
| Search facility… | Filter the list to only display nominations tied to a specific facility name. |
| Month Dropdown | Narrow down records by selecting a specific month of the calendar year. |
| Year Dropdown | Switch the view between different calendar years to audit historical data. |
| Status Dropdown | Filter the entries by their active operational state (defaults to All Status). |
Actions
| Button | Use for |
|---|---|
| Create Nomination | Opens the creation workflow to submit a new product volume request for this producer. This can be accessed via the top-right action button or the center placeholder button when the list is empty. |
Create a new inbound nomination
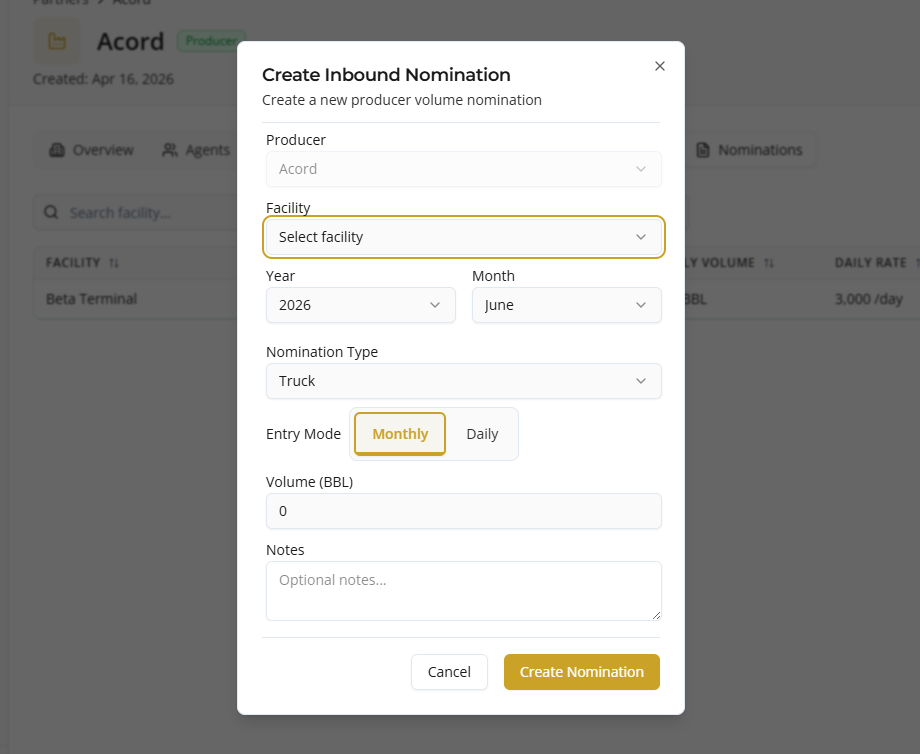
- Click Create Nomination in the top right.
- The Create Inbound Nomination dialog box opens overlaying the screen.
- The Producer field is pre-selected and locked to the active partner (e.g., Acord).
- Click the Facility dropdown and select the destination terminal (e.g., Alpha Terminal, Beta Terminal).
- Select the scheduling Year and Month using their respective dropdown menus.
- Choose the Nomination Type (Truck, Pipe, or Combined).
- Under Entry Mode, toggle between Monthly or Daily depending on how you want to log the volumes.
- Click into the Volume (BBL) numeric field and input the designated volume quantity.
- (Optional) Click into the Notes text area to type any additional operational context.
- Review the details and click the Create Nomination button at the bottom to save successfully.
View Nomination Details
- Navigate to the Nominations page from the main sidebar.
- Click on a specific nomination entry from the list (e.g., Acord - Beta Terminal).
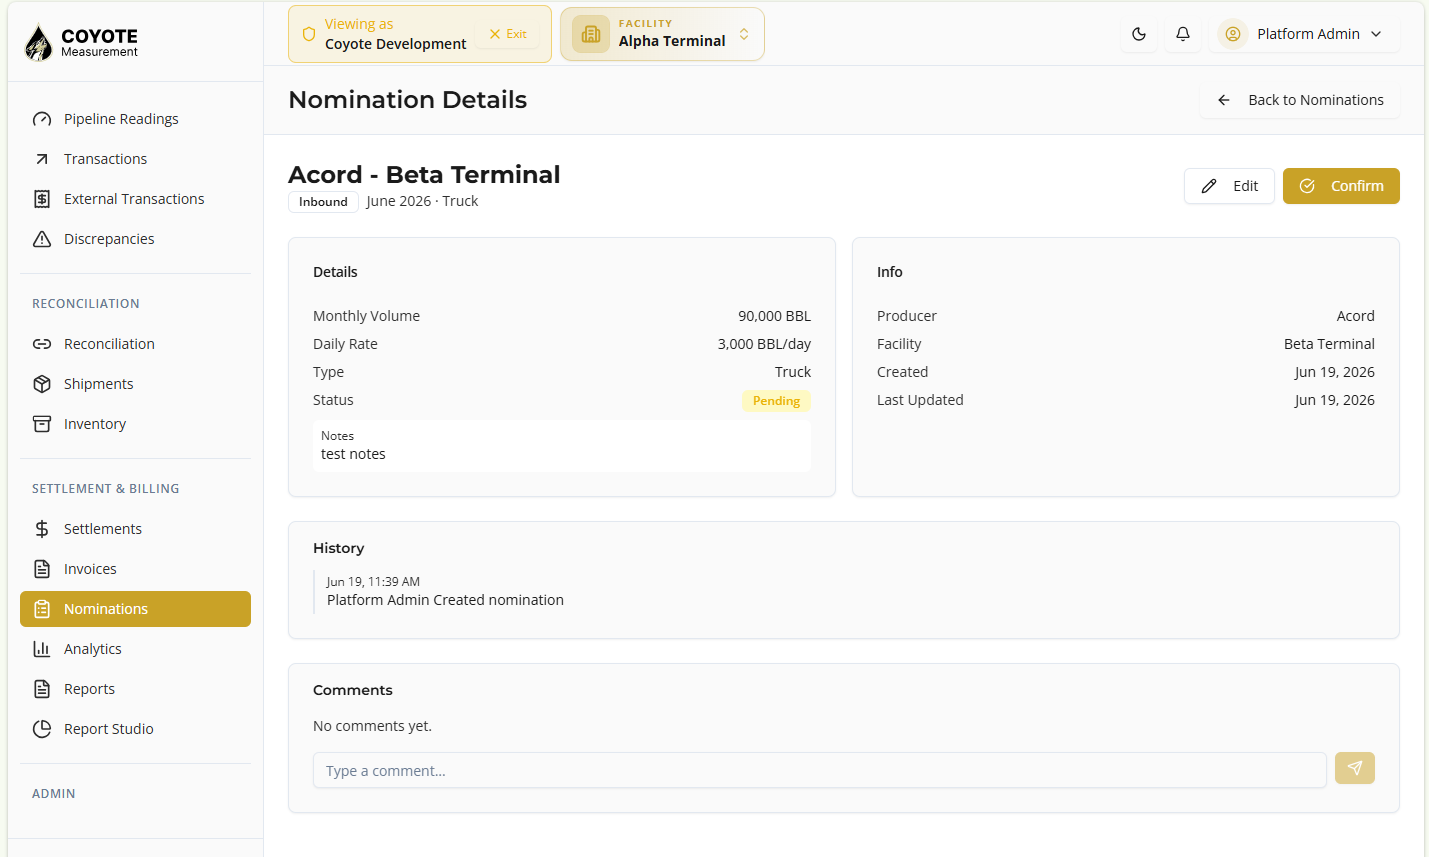
- The Nomination Details page opens, displaying the header metadata including the Partner Name, Facility Name, Flow Direction (Inbound / Outbound), Scheduling Period (Month/Year), and Transport Type (Truck, Pipe, Combined).
- Review the Details Card to see core metrics: Monthly Volume, Daily Rate (automatically calculated), Type, Status, and any custom Notes.
- Review the Info Card to see system tracking data: Producer, Facility, Created timestamp, and Last Updated timestamp.
- Scroll down to see the History section, which displays an audit trail tracking the exact date, time, and user who performed actions.
- View the Comments timeline at the bottom to read logs or internal updates posted to the record.
Actions on the Page
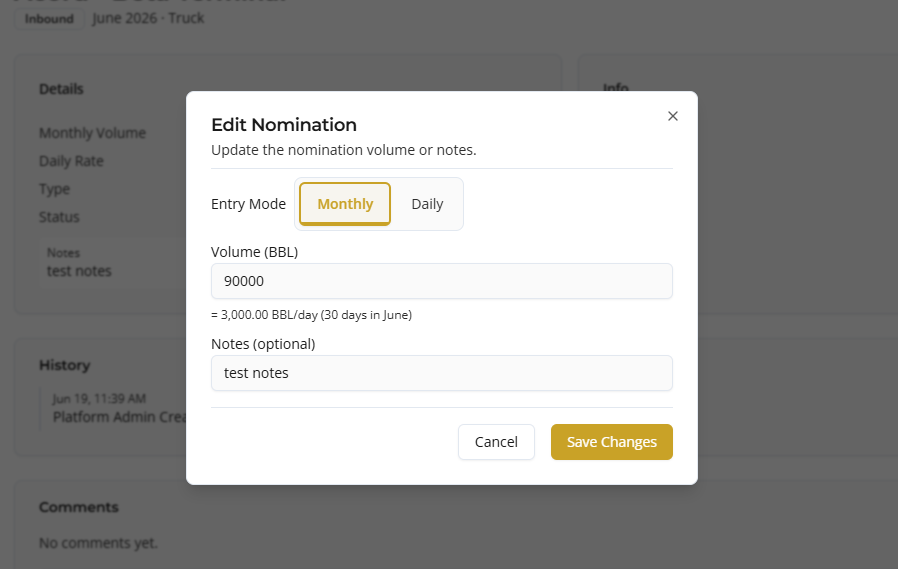
- Edit Nomination: Click the Edit button in the top right to adjust volumes, dates, or notes.
-
Confirm Nomination: Click the Confirm button to validate and approve a pending nomination.
-
Add a Comment: Click into the text area at the bottom labeled “Type a comment…”, enter your internal note, and click the yellow Send icon.
-
Exit Details: Click the Back to Nominations arrow link in the top right corner to return to the main list.
Step 4 — Edit Partner Profile
- On the specific partner’s detail profile view page, click the Edit icon in the upper right corner.
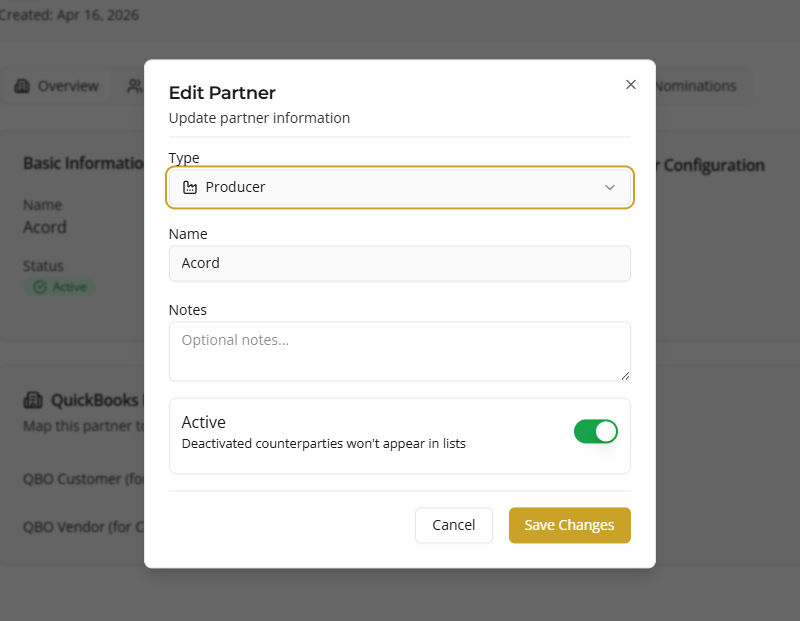
- The Edit Partner dialog panel will appear over the screen.
- Update any of the following fields as needed:
- Type: Modify or append functional role types from the dropdown menu (e.g., changing or multi-selecting roles like Producer, Carrier, Customer, etc.).
- Name: Edit the primary legal or display name of the company.
- Notes: Add or adjust optional descriptive notes or labels used to categorize the counterparty.
- Active Toggle: Use the green switch to toggle the partner’s status. Deactivating counterparties hides them from transaction dropdowns while preserving historical records.
- Click Save Changes to commit your updates to the global directory, or click Cancel / the X icon to discard changes.
Related topics
- Overview — facilities and partners
- Facilities — step-by-step facilities
- Products — step-by-step products
- Drivers — step-by-step drivers